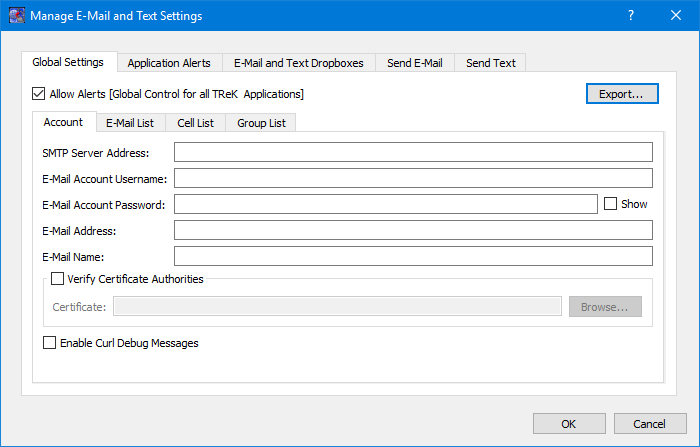
The Manage E-Mail and Text Settings Dialog is shown in Figure 16. This dialog provides the capability to manage global e-mail and text settings, application alert settings, e-mail and text dropboxes, and the capability to send an e-mail or text.
The TReK software’s e-mail and text capability is dependent on libcurl, an open source client-side URL transfer library developed by the cURL project. The libcurl library provides C API functions that configure the library to programmatically establish a secure connection with an email server using a Transport Layer Security (TLS) version 1.3 socket prior to logging into an email account using an email account name and password.
The TReK email and text capability has been successfully tested with the Google Gmail server. It is recommended that users create a new Gmail account and use it to send emails and texts to designated recipients. The TReK software does not support retrieving emails from the user's Gmail account. When creating the Gmail account to send emails and texts you will need to configure your Gmail account to enable two-step verification and you need to generate a Gmail App Password for TReK. Please reference Gmail Help for instructions. The Gmail App Password is used in place of your e-mail account password on the Global Settings Account tab in the “Manage E-Mail and Text Settings” dialog. TReK recommends only using the Gmail account to send emails and texts using the TReK software. TReK does not recommend using the account to receive emails.
The maximum size of a text message is approximately 900 characters. However, if you send more than 900 characters your message may be broken up during transmission and then concatenated on the recipient’s phone. The maximum length of a TReK email message is 65,000 characters or bytes. The maximum length of an email with a file attachment is generally considered to be 10MB (email message size plus file attachment size). Note, file attachments may become much larger than their original file sizes. This is due to the encoding employed by email servers when sending non text-based information.
Global Settings
Global Settings are e-mail and text settings used in all TReK applications. They can be changed in any TReK application with a Manage E-Mail and Text Settings dialog. When you change a setting on the Global Settings tab, it will be changed for all TReK applications. Each Tab is described below.
Allow Alerts
The Allow Alerts Checkbox is a global setting to turn on and off all alerts in all TReK applications. If you turn this checkbox off, no alerts will be generated in any applications.
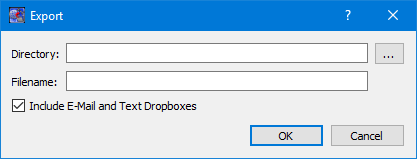
Export
The Export button provides access to the Export dialog shown Figure 17. This dialog provides the capability to save the settings on the Global Settings tab in a TReK email configuration file that can be used with the TReK E-Mail and Text API. You also have the option to include the dropboxes defined on the E-Mail and Text Dropboxes tab.
Account
In order to use the Alerts capability, you must have a Gmail account. The Gmail account must be configured with two-step verification enabled and you must have a Gmail App Password for TReK. Please reference Gmail Help for instructions. The Account tab is used to enter your Gmail account information. The TReK software only stores account information locally. The account password will be hidden by default and will always be encrypted when it is stored. Please enter the Gmail App Password you generated for TReK in the E-Mail Account Password field (not your Gmail account password). This password will only be decrypted when it is used communicate with the Gmail server to execute a requested function. An example of account information is shown below.
smtp_server_address: smtp.gmail.com
email_account_username: jane.doe@gmail.com
email_account_password: Gmail App Password for TReK [Hidden unless show checkbox is checked]
email_address: jane.doe@gmail.com
email_name: Jane Doe
The Verify Certificate Authorities checkbox is used to turn on the certificate authority check. If you turn on the certificate authority check, you must provide the complete path to a Certificate file.
The Enable Curl Debug Messages checkbox is used to turn on additional debug messages generated by the curl software library.
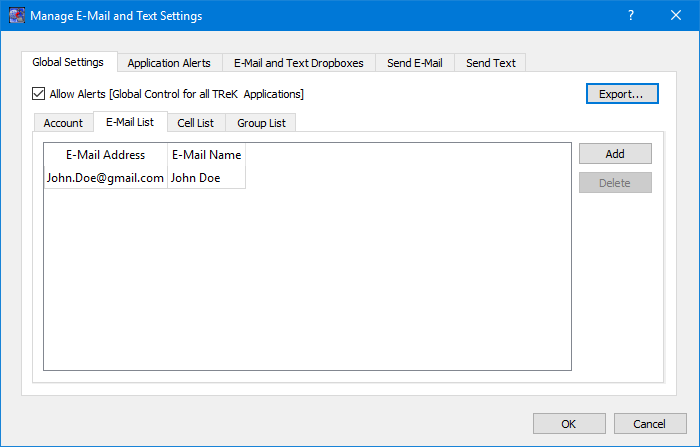
E-Mail List
The E-Mail List tab is used to enter e-mail addresses that will be used to populate the e-mail address list that is available when configuring alert functions or sending an e-mail. The E-Mail List tab is shown in Figure 18. The Add button is used to add a row to enter e-mail address information. The Delete button is used to delete a row.
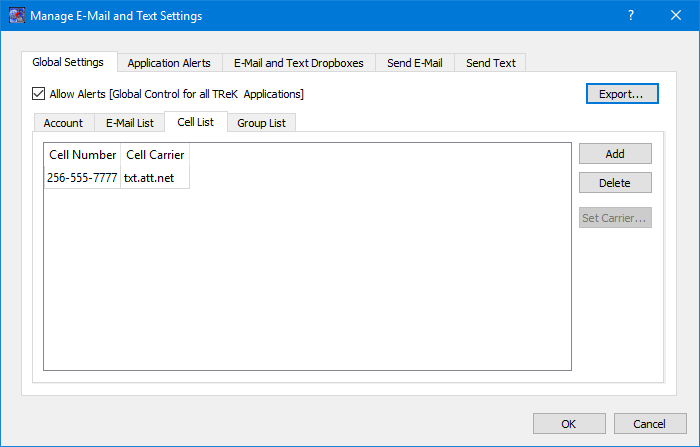
Cell List
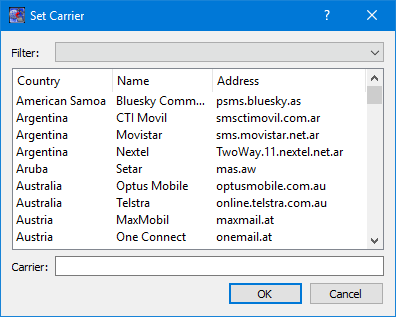
The Cell List tab is used to enter mobile cell phone numbers that will be used to populate the Cell list that is available when configuring alert functions or sending a text. The Cell List tab is shown in Figure 19. The Add button is used to add a row to enter cell number information. The Delete button is used to delete a row. Cell numbers can be entered with or without dashes. The Set Carrier button is available when a Cell Carrier cell is selected. It is shown in Figure 20 and can be used to select a carrier address. If the carrier address you need is not in the list, you can enter it directly into the cell.
Note: The cell carrier list is populated from a file in the TReK install (config/cell.txt). If you wish to edit the file and make a custom list of carriers to be displayed in the dialog, copy the cell.txt file to the root directory of the TReK workspace and make your changes. If a cell.txt file exists in the root directory of the TReK workspace, it will be used instead of the one available in the install.
Group List
When configuring an application alert or sending an e-mail or text, you will have the option to identify an e-mail address, a cell phone number, or a group as a recipient. The Group List is shown in Figure 21. You can define zero or more groups. A group can contain e-mail addresses and cell numbers. If you have a group with both e-mail addresses and cell numbers and you send an e-mail to that group, the e-mail generated will only be sent to the e-mail addresses in the group. You can add, modify, and delete a group using the buttons on the right.
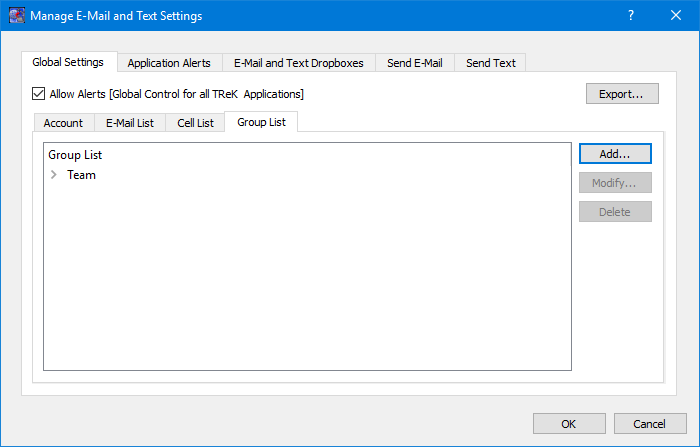
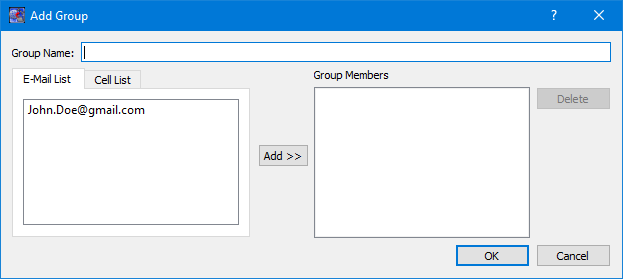
The Add button will display the Add Group dialog shown in Figure 22. At the top you can enter a name for the group. On the left you will see all the e-mail addresses and cell numbers you entered on the Global Settings main E-Mail List and Cell List tabs. You can add zero or more e-mail addresses and zero or more cell numbers to a group. To add an e-mail or cell to the group, select the e-mail or cell number on the left and push the Add button to add it to the group. You can use the Delete button to delete a recipient from the group.
Application Alerts
The Application Alerts tab is shown in Figure 23. It is used to configure application specific alerts.
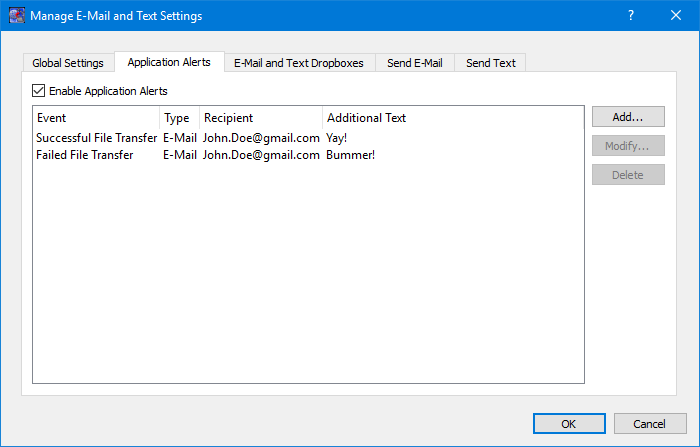
Enable Application Alerts
The Enable Application Alerts Checkbox is used to turn all alerts on or off in the current application. If you uncheck Enable Application Alerts, no alerts will be generated in the Command application.
Event List
The Event area provides the capability to identify one or more alerts to send when a specific application event occurs. You can add, modify, and delete alerts using the buttons on the right. The Add button will display the Add Alert dialog shown in Figure 24.
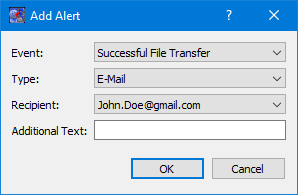
Event
The Event is what triggers the alert. There may be one or more events in an application that can trigger an alert. The CFDP application can generate an alert for the following types of events:
Successful File Transfer
This event is triggered when a file is successfully transferred.
Failed File Transfer
This event is triggered when a file transfer fails.
12/24 and 24 Hour Status Reports
There are two status report events that can be trigged, a 12/24 hour status report and a 24 hour status report. The status report events deliver the CFDP status report by sending a text and/or email to a list of designated recipients. The CFDP status report text alert identifies the number of file transfers that were a success, were a failure, were cancelled, were abandoned or were unknown over a twelve and twenty four hour period. The CFDP status report text alert also includes information on the number of TReK error messages that were generated and the number of Native CFDP AOS windows exceeding sixty seconds (assuming TReK Native CFDP is configured to automatically suspend and resume CFDP transactions) that were encountered over the twelve and twenty four hour period. The CFDP status report email alert includes all the information found in the CFDP status report text alert but also provides an email file attachment detailing each individual file transaction, error message and Native CFDP AOS window. The twelve hour CFDP status report is sent as a text and/or email at 6:00 p.m. local time and the twenty four hour CFDP status report is sent as a text and/or email at 6:00 a.m. local time. After the twenty four CFDP status report alert is sent, all transaction counts, error counts and Native CFDP AOS window counts are reset to zero. The CFDP status report email file attachment includes the last fifty TReK error messages for the twelve and twenty four hour periods and also includes the details about the Native CFDP AOS windows that exceed sixty seconds in duration for the twelve and twenty four hour periods.
The following is an example of a TReK CFDP status report and includes the messages only found in the CFDP status report email file attachment:
GMT 2020-11-12 11:00:00 to 2020-11-12 23:00:00
CFDP EID 1 status report duration 12:00:00
Status Report
2 Successful transactions
0 Failed transactions
2 Cancelled transactions
0 Abandoned transactions
0 Unknown transactions
2 CFDP AOS windows
3 TReK error messages
Success Messages: 2
1. GMT 2020-11-12 13:54:24:575 Transaction 2_1 (/home/name/xfer0030 -> D:/xfer0030) decrypted: successful. File size 300000 bytes.
2. GMT 2020-11-12 13:55:18:581 Transaction 1_2 (D:/1000_scp/xfer0040 -> /home/name/xfer0040a) encrypted: successful. File size 400000 bytes.
Cancel Messages: 2
1. GMT 2020-11-12 13:54:41:576 Transaction 2_2 (/home/name/xfer0030 -> D:/xfer0030) decrypted: cancelled (Filestore rejection). File size 300000 bytes.
2. GMT 2020-11-12 13:54:59:599 Transaction 1_1 (D:/1000_scp/xfer0040 -> /home/name/xfer0040) encrypted: cancelled (Filestore rejection). File size 400000 bytes.
CFDP AOS Windows (greater than 60 seconds): 2
1. GMT 2020-11-12 13:54:18 to 2020-11-12 13:55:30 CFDP AOS window duration of 0:01:12
2. GMT 2020-11-12 13:55:36 Current CFDP AOS window duration of 9:04:24
TReK Error Messages: 3
1. GMT 2020-11-12 13:54:41:522 cfdp_engine: unable to rename 'D:/tmp_cfdp0002488' to 'D:/xfer0030'. (cfdp_transceiver.cpp:319)
2. GMT 2020-11-12 13:54:41:522 cfdp_engine: are they on separate filesystems? (cfdp_transceiver.cpp:319)
3. GMT 2020-11-12 13:54:41:523 :::Fault trans 2_2, fault='Filestore rejection'. (cfdp_transceiver.cpp:319)
Type
The type of alert to send. Options are E-Mail, E-Mail and Text, or Text.
Recipient
The recipient identifies who should be notified when the event is triggered. The Recipient list will be populated with applicable recipients based on Type. If you select E-Mail in the Type menu, the Recipient list will be populated with e-mails from the E-Mail List tab and groups that contain at least one e-mail address from the Group List tab. If you select E-Mail and Text in the Type menu, the Recipient list will be populated with groups from the Group List tab that contain at least one e-mail address and one cell phone number. If you select Text in the Type menu, the Recipient list will be populated with cell phone numbers from the Cell List tab and groups that contain at least one cell phone number from the Group List tab.
Additional Text
The alert will contain the name of the event that occurred and any text that is provided in the Additional Text field. Additional Text is optional.
E-Mail and Text Dropboxes
The E-Mail and Text Dropboxes tab is shown in Figure 25. This tab can be used to define E-Mail and Text Dropboxes. It is important to remember that each E-Mail and Text Dropbox will correspond to a directory on the file system and must be unique. Using a directory for more than one dropbox will result in unexpected behavior. When you define a dropbox using the Manage E-Mail and Text Settings dialog, the dropbox information is automatically saved with that specific application’s settings.

Dropbox List
The Dropbox List is used to define zero or more dropboxes. For each dropbox you can define the Dropbox Type, the Dropbox Path, the Dropbox Success Path, a Recipient, and a State. The buttons on the right can be used to add, modify, delete, or change the state of a dropbox. The Add Dropbox dialog is shown in Figure 26.
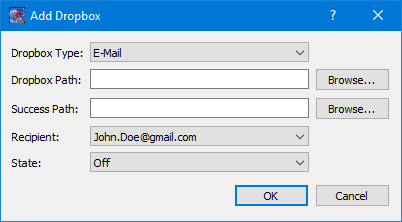
Dropbox Type
There are three types of dropboxes: E-Mail, E-Mail File, and Text. An E-Mail dropbox will e-mail the contents of a text file placed in the dropbox. An E-Mail File dropbox will e-mail the file placed in the dropbox. A Text dropbox will text the contents of a text file placed in the dropbox. E-Mail and Text dropboxes only support text files. Dropping other file types into these dropboxes will have unexpected results (e.g. send garbage). The E-Mail File dropbox supports many common file types including but not limited to text files, Portable Document Format (PDF) files, and Microsoft Office files. It does not support executable files. The E-Mail File dropbox will generate an error or fail to send file types that are not supported.
Dropbox Path
The Dropbox Path identifies the local directory to be used for the dropbox. The Browse button can be used to select a directory.
Dropbox Success Path
The Dropbox Success Path is optional. If the Dropbox Success Path is defined, the dropbox will move the original file placed in the dropbox to the success directory if and only if the corresponding e-mail or text is successfully delivered to the e-mail server. If the success path is empty, the dropbox will delete the original file placed in the dropbox if and only if the corresponding e-mail or text is successfully delivered to the e-mail server. If the dropbox fails to generate the e-mail or text, the file will be renamed with a time tagged ".droperror" extension and remain in the dropbox. The dropbox will not attempt to generate an e-mail or text for a file with a ".droperror" extension in its filename.
Recipient
The Recipient identifies the designated recipient(s) for the e-mail or text. The Recipient list will be populated with applicable recipients based on the Dropbox Type. For example, if you select E-Mail or E-Mail File in the Type menu, the Recipient list will be populated with e-mails from the E-Mail List Tab and groups with at least one e-mail address from the Group List Tab. If you select Text in the Type menu, the Recipient list will be populated with cell phone numbers from the Cell List Tab and groups with at least one cell number from the Group List Tab.
State
The state controls whether the dropbox is activated. It can be set to Off or On. If the state is set to Off, the dropbox will not be activated. If the state is set to On, the dropbox will be activated when you push the OK button. If the state is set to On when you exit the application, it will automatically be activated the next time you run the application. If you do not want the dropbox to be activated on application initialization, set the state to Off before exiting the application.
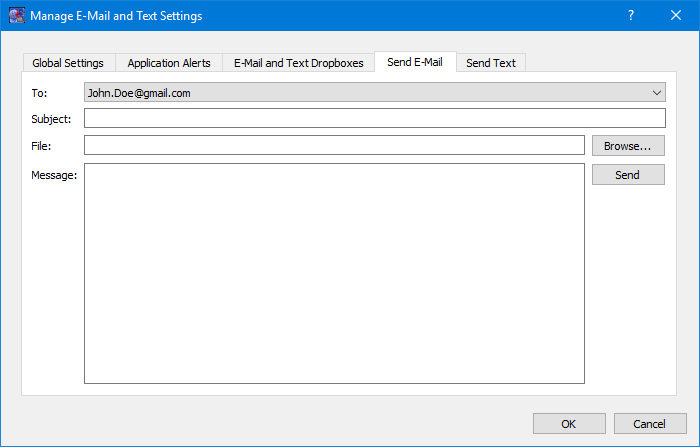
Send E-Mail
The Send E-Mail tab is shown in Figure 27. This tab can be used to send an e-mail if valid information has been entered on the Global Settings tab. Once the To, Subject, optional File (Browse can be used to browse the local disk for a file), and Message information has been entered, press the Send button to send the e-mail. This will initiate a request to send the e-mail. Look at the main window message area for information about whether the e-mail request was successful or encountered any errors.
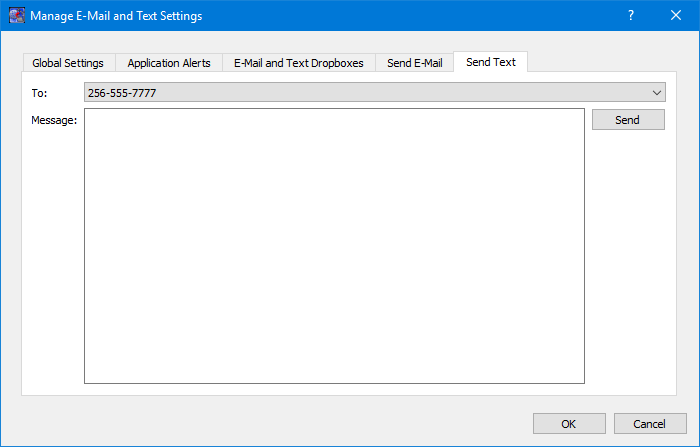
Send Text
The Send Text tab is shown in Figure 28. This tab can be used to send a text if valid information has been entered on the Global Settings tab. Once the To and Message information has been entered, press the Send button to send the text. This will initiate a request to send the text. Look at the main window message area for information about whether the text request was successful or encountered any errors.